Hi everyone,
I wanted to share a PowerShell script I’ve been working on that might be useful for anyone building more automated or repeatable 360° missions in Litchi for later panorama stitching from recorded video footage.
What it does
The advantage here is efficiency: portrait video gives you higher vertical coverage per frame, and continuous recording avoids stop-and-go capture delays. Combined with the even Fibonacci distribution, this results in a dataset that stitches cleanly into a high-resolution panorama or even a full 360° environment, depending on your pitch limits.
In short, you’re trading discrete photo capture for a smooth, continuous acquisition pass—while still preserving the geometric consistency needed for reliable stitching.
The script generates a ready-to-import .csv mission file for the Litchi Flight Hub using nothing more than a set of geo coordinates. It distributes waypoints over a partial sphere using a Fibonacci lattice and adds a micro-orbit pattern, which results in smooth and continuous capture— especially useful for 360° or structured scanning shots.
Key features
- Automatic waypoint generation from a single lat/lon
- Fibonacci-based spherical distribution for even coverage
- Micro-orbit motion for allowing Litchi to recognize different waypoints
- Configurable overlap between shots
- Adjustable gimbal pitch limits (top to bottom coverage)
- Optional portrait mode (9:16)
- Built-in video start option at mission begin
- Outputs directly to a Litchi-compatible CSV
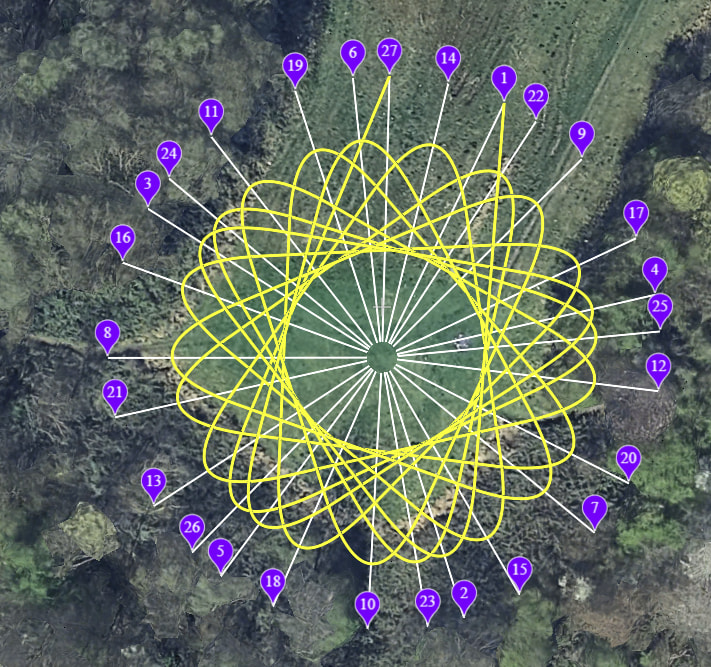
The Fibunacci pattern in the 2D view as one picture may describe things better than thound words:
And a video of what the route would look like:

Raw video footage:

Usage examples
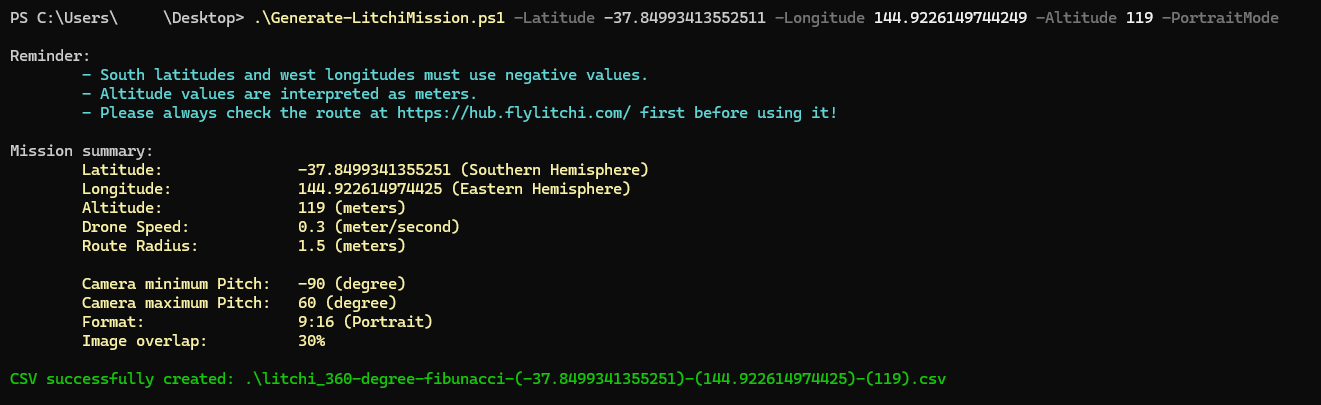
.\Generate-LitchiMission.ps1 -Latitude 52.5200 -Longitude 13.4050
With more options
.\Generate-LitchiMission.ps1 -Latitude 52.5200 -Longitude 13.4050 -Altitude 120 -PortraitMode -VideoMode
The created .csv file can be found in the folder of the powershell script.
The powershell script
Generate-LitchiMission.ps1
<#
.SYNOPSIS
    Generates a Litchi mission (Fibonacci spiral) as a CSV file for import into Litchi Flight Hub.

.DESCRIPTION
    Creates waypoints distributed over a partial sphere using a Fibonacci lattice.
    Applies a micro-orbit pattern to enable smooth, continuous video capture.

.PARAMETER Latitude
    Latitude of the capture location.

.PARAMETER Longitude
    Longitude of the capture location.

.PARAMETER PortraitMode
    Enables 9:16 (portrait) calculation.

.PARAMETER MinOverlap
    Desired overlap between shots (e.g., 0.30 = 30%).
    Default value is 0.30.

.PARAMETER MaxPitch
    Maximum upward gimbal tilt angle in degrees.
    Default value is 60.

.PARAMETER MinPitch
    Maximum downward gimbal tilt angle in degrees.
    Default value is -90.

.PARAMETER Radius
    Micro-orbit radius in meters.
    Default value is 50.

.PARAMETER Speed
    Drone speed factor (e.g., 0.30 = 0.3 meters/s).
    Default value is 0.30.

.PARAMETER VideoMode
Starts video recording at the first waypoint.

.PARAMETER Filename
    Output CSV file path.
    Default value is ".\litchi_360-degree-fibonacci-$Latitude_$Longitude.csv".

.EXAMPLE
    .\Generate-LitchiMission.ps1 -Latitude 52.5200 -Longitude 13.4050

.EXAMPLE
    .\Generate-LitchiMission.ps1 -Latitude 52.5200 -Longitude 13.4050 -Altitude 120 -PortraitMode -VideoMode

.NOTES
    Outputs a CSV file compatible with Litchi Flight Hub mission import.
#>

param(
    [Parameter(Mandatory=$true)][double]$Latitude,
    [Parameter(Mandatory=$true)][double]$Longitude,

    [double]$Altitude = 50,

    [switch]$PortraitMode,
    [double]$MinOverlap = 0.30,

    [double]$MinPitch = -90,
    [double]$MaxPitch = 60,

    [double]$Radius = 1.5,
    [double]$Speed = 0.3,

    [switch]$VideoMode,

    [string]$Filename = ".\litchi_360-degree-fibunacci-$Latitude-$Longitude-$Altitude.csv"
)

$culture = [System.Globalization.CultureInfo]::InvariantCulture

# --- 1. FOV & POINT CALCULATION ---
if ($PortraitMode) {
    $hFOV = 48.0; $vFOV = 75.0; $FormatName = "9:16 (Portrait)"
} else {
    $hFOV = 75.0; $vFOV = 48.0; $FormatName = "16:9 (Landscape)"
}

$hEff = ($hFOV * [Math]::PI / 180.0) * (1 - $MinOverlap)
$vEff = ($vFOV * [Math]::PI / 180.0) * (1 - $MinOverlap)
$omega_frame = $hEff * $vEff

$zMin = [Math]::Sin($MinPitch * [Math]::PI / 180.0)
$zMax = [Math]::Sin($MaxPitch * [Math]::PI / 180.0)
$zRange = $zMax - $zMin
$area_segment = 2 * [Math]::PI * $zRange
$requiredPoints = [Math]::Ceiling($area_segment / $omega_frame)

$PointsToGenerate = if ($requiredPoints -gt 99) { 99 } else { [Math]::Min(99, ($requiredPoints + 5)) }

Write-Host "Format: $FormatName | Radius: $Radius m" -ForegroundColor Cyan
Write-Host "Points: $PointsToGenerate (calculation for coverage)" -ForegroundColor Yellow

# --- 2. CSV HEADER ---
# Header needs to fit the Litchi format!
$header = "latitude,longitude,altitude(m),heading(deg),curvesize(m),rotationdir,gimbalmode,gimbalpitchangle," +
          "actiontype1,actionparam1,actiontype2,actionparam2,actiontype3,actionparam3,actiontype4,actionparam4," +
          "actiontype5,actionparam5,actiontype6,actionparam6,actiontype7,actionparam7,actiontype8,actionparam8," +
          "actiontype9,actionparam9,actiontype10,actionparam10,actiontype11,actionparam11,actiontype12,actionparam12," +
          "actiontype13,actionparam13,actiontype14,actionparam14,actiontype15,actionparam15," +
          "altitudemode,speed(m/s),poi_latitude,poi_longitude,poi_altitude(m),poi_altitudemode,photo_timeinterval,photo_distinterval"

$sb = New-Object System.Text.StringBuilder
[void]$sb.AppendLine($header)

# --- 3. GENERATION ---
$GoldenAngle = (2 * [Math]::PI) * (1 - 1/((1 + [Math]::Sqrt(5)) / 2))
$TotalTheoreticalPoints = [Math]::Round($PointsToGenerate * (2.0 / $zRange))

$EarthRadius = 6378137
$dLat_Per_M = 1 / ($EarthRadius * [Math]::PI / 180)

$count = 0

for ($i = 0; $i -lt $TotalTheoreticalPoints; $i++) {
    $z = -1 + (2 * $i / ($TotalTheoreticalPoints - 1))

    if ($z -ge $zMin -and $z -le $zMax) {
        if ($count -ge $PointsToGenerate) { break }

        # CAlculate angles
        $pitchDeg = ([Math]::Asin($z) * 180.0 / [Math]::PI)
        $theta = $i * $GoldenAngle
        $headingDeg = ($theta * 180.0 / [Math]::PI) % 360
        if ($headingDeg -lt 0) { $headingDeg += 360 }

        # Micro-orbit coordinates
        $dLat = [Math]::Cos($theta) * $Radius * $dLat_Per_M
        $latRad = $Latitude * [Math]::PI / 180
        $dLon = [Math]::Sin($theta) * $Radius * (1 / ($EarthRadius * [Math]::Cos($latRad) * [Math]::PI / 180))

        $sLat = ($Latitude + $dLat).ToString($culture)
        $sLon = ($Longitude + $dLon).ToString($culture)
        $sAlt = $Altitude.ToString($culture)
        $sHead = $headingDeg.ToString($culture)
        $sPitch = $pitchDeg.ToString($culture)
        $sCurve = ($Radius * 0.5).ToString($culture)
        $sSpeed = $Speed.ToString($culture)


        $act1_Type = "-1"; $act1_Param = "0"

        # Video Trigger at first point
        if ($VideoMode -and $count -eq 0) {
            $act1_Type = "2" # Start Recording
            $act1_Param = "0"
        }

        # Building strings
        $actionsString = "$act1_Type,$act1_Param"

        for ($k=0; $k -lt 14; $k++) {
            $actionsString += ",-1,0"
        }

        # AltitudeMode, hardcoded to 0 (relative to home / takeoff).
        $altMode = "0"

        # rotationdir=0, gimbalmode=2
        $line = "$sLat,$sLon,$sAlt,$sHead,$sCurve,0,2,$sPitch," +
                "$actionsString," +
                "$altMode,$sSpeed,0,0,0,0,-1,-1"

        [void]$sb.AppendLine($line)
        $count++
    }
}

try {
    $sb.ToString() | Out-File -FilePath $Filename -Encoding ASCII
    Write-Host "CSV successfully created: $Filename" -ForegroundColor Green
} catch { Write-Error $_ }
Testing
I have tested the created waypoint missions with my DJI Mini 3 Pro.
From what I understand one may good to use those settings:
- Set a fitting White Balance for the conditions manually (for not having any color-shifts within parts of the pictures)
- ISO 100
- Allow the Shutter Speed do its’ thing in auto
This should produce the most crisp panorama images from my experiences. I was trying to set the SS manually and let lighting be adjusted by ISO being in auto - but results were having less contrast.
Stitching of panoramas
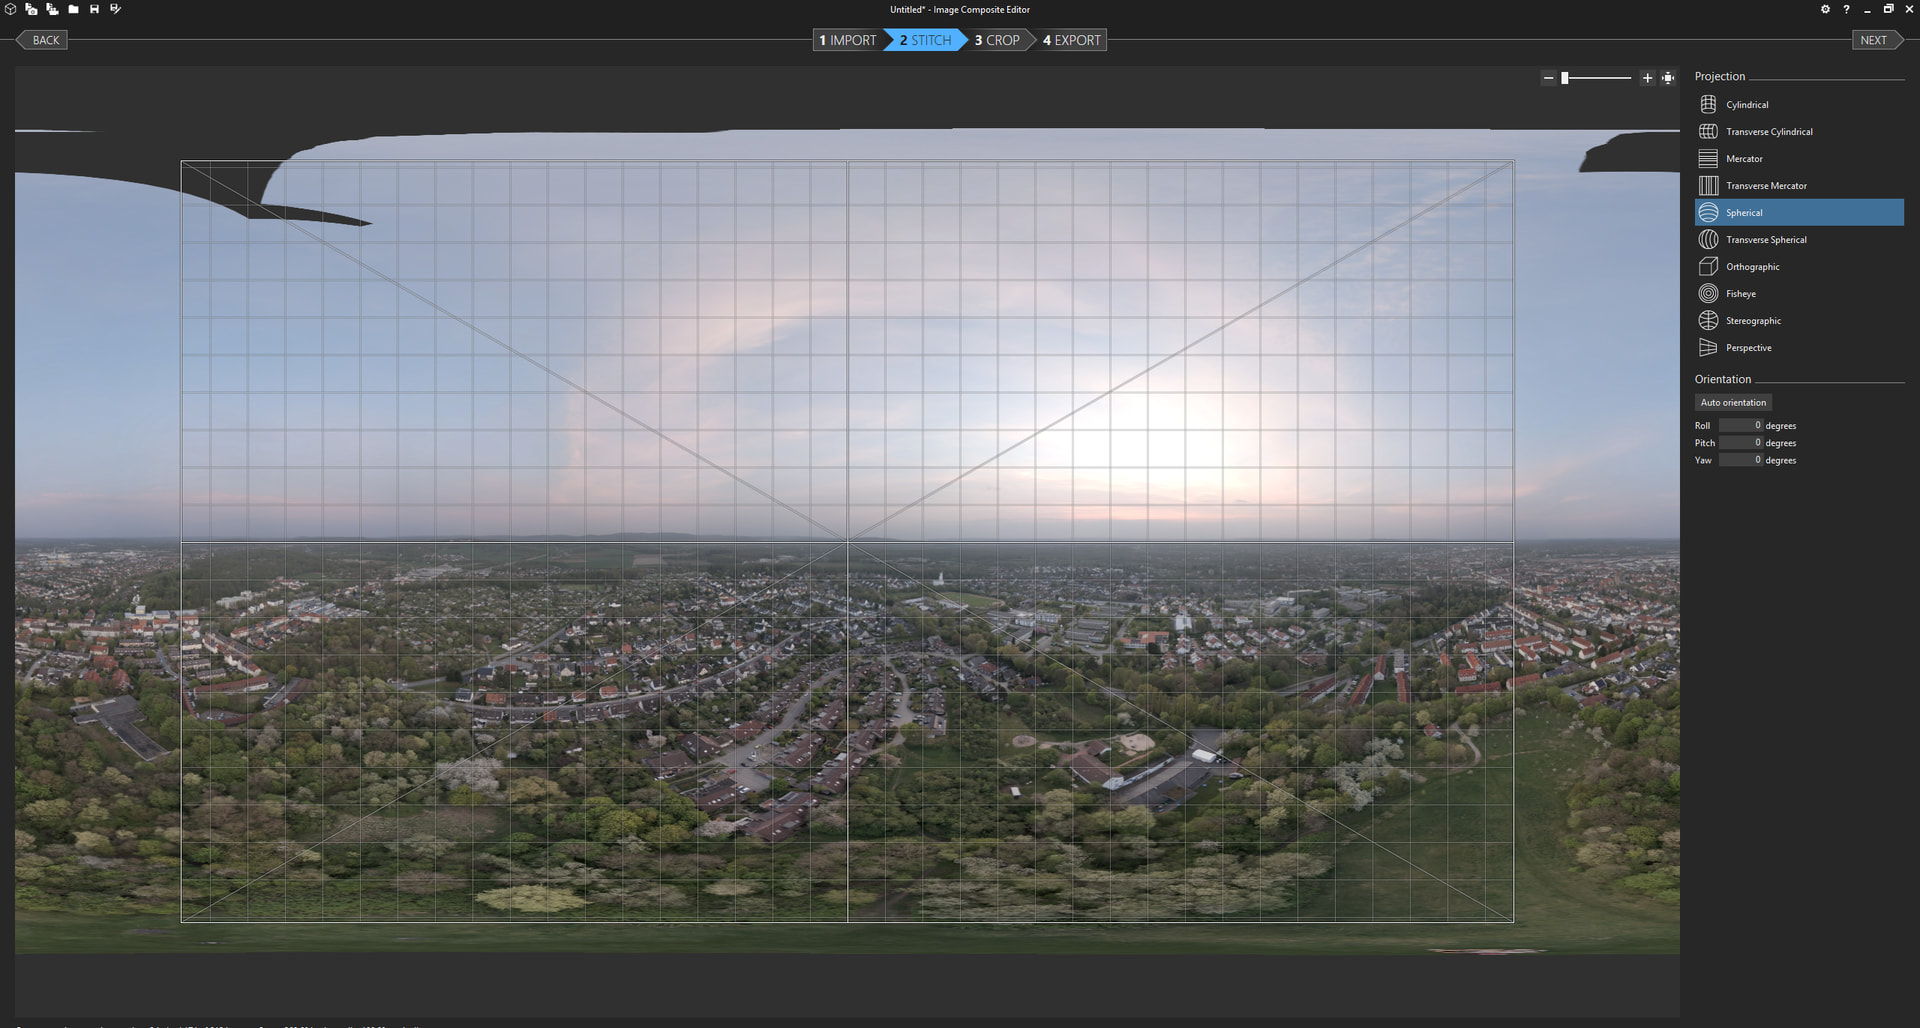
For stitching I am using some possibly not very well known Windows application, called “Image Compositing Editor”, the software allows to easily feed not only images, but videos for it working on a panorama. Additionally it allows for some further post corrections, also having a “auto-complete” function for filling gaps with some sort of algorithms (not known how exactly its done, think without any AI yet as it is an older piece of software already).
Example footage of stitched material
Raw & not further post edited panorama from the Image Composite Editor application:
Another example in Google Maps: Google Maps
Last comments
With the video footage of the waypoint missions I am getting very reliable results in ways of not having any huge gaps for any ground related objects - skies with fastly moving clouds or foggy conditions may create some artifacts.
If anyone is experimenting with automated capture workflows, 360 imagery, or just wants a faster way to build complex waypoint paths, feel free to try it out.
Example of a resulting route which has been imported as CSV: Litchi Hub
If anybody wants to take this proof-of-concept away to create even better solutions, please feel free - I would be happy for a backlink for me then knowing your better solution.
Best regards